Fully Convolutional Networks (FCNs) for Image Segmentation
A post showing how to perform Image Segmentation using Fully Convolutional Networks that were trained on PASCAL VOC using our framework.
Introduction
In this post we want to present Our Image Segmentation library that is based on Tensorflow and TF-Slim library, share some insights and thoughts and demonstrate one application of Image Segmentation.
To be more precise, we trained FCN-32s, FCN-16s and FCN-8s models that were described in the paper “Fully Convolutional Networks for Semantic Segmentation” by Long et al. on PASCAL VOC Image Segmentation dataset and got similar accuracies compared to results that are demonstrated in the paper.
We provide all the training scripts and scripts to convert PASCAL VOC into easier-to-use .tfrecords file. Moreover, it is very easy to apply the same scripts to a custom dataset of your own.
Also, in the repository, you can find all the trained weights and scripts to benchmark the provided models against PASCAL VOC. All the FCN models were trained using VGG-16 network initialization that we took from TF-Slim library.
After that, we demonstrate how to create your own stickers for Telegram messaging app using our pretrained models, as a Qualitative Evaluation of our trained models. While the Quantitative Results are presented in the repository.
The blog post is created using jupyter notebook. After each chunk of a code you can see the result of its evaluation. You can also get the notebook file from here.
Training on PASCAL VOC
The models were trained on Augmented PASCAL VOC dataset which is mentioned in the paper by Long et al. The FCN-32s model was initialized from VGG-16 model and trained for one hundred thousand iterations. The FCN-16s was initialized with FCN-32s weights and also trained for one hundred thousand iterations. FCN-8s was trained in the same fashion with initialization from FCN-16s model.
The reason why the authors of the paper add skips is because the results produced by the FCN-32s architecture are too coarse and skips are added to lower layers of the VGG-16 network which were affected by smaller number of max-pooling layers of VGG-16 and, therefore, can give finer predictions while still taking into account more reliable higher level predictions.
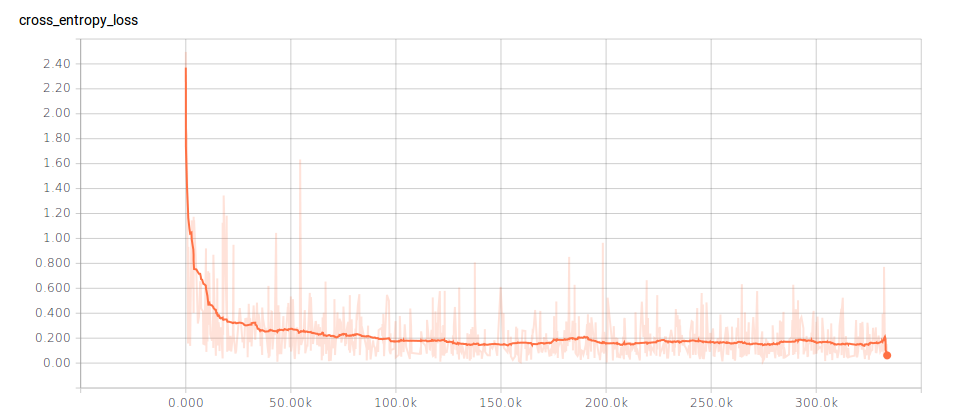
During the training, we noticed that the cross entropy loss was decreasing, after we added skips that FCN-16s and FCN-8s models have. Also, during the training we randomly change the scale of the training image. Due to this fact, we had to normalize the cross entropy loss, because, otherwise, it was hard to understand if the loss is decreasing (we had different number of pixels on each iteration stage as a result of random scaling). Here you can see the cross entropy loss plot:
We trained with a batch size one and used Adam optimizer. It is important to state here, that although we trained with a batch size one, which might sound crazy – it actually means that after we do forward propagation for one image, we get predictions for each pixel. Then, we compute the pixel-wise cross-entropy. So, batch size one only means that we use one image per iteration, which consists of pixel-wise training samples.
Overall, we achieved comparable or better performance with the original paper. You can find our results in the repository.
Qualitative results
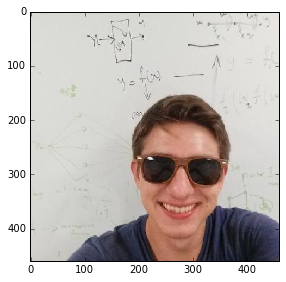
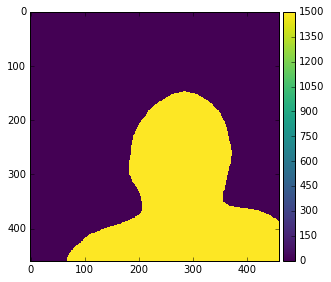
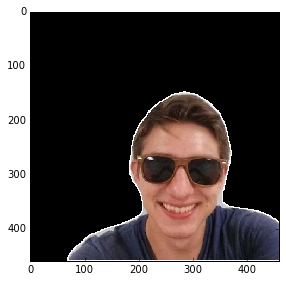
In order to show some results of Segmentation produced by aforementioned models, let’s apply the trained models to unseen images that contain some objects that represent one of PASCAL VOC classes. After we get segmentation masks, we create a countour for our segmentation masks, to create stickers and we save everything as a png file with alpha channel, to display only object and make background transparent.
%matplotlib inline

from __future__ import division

import os
import sys
import tensorflow as tf
import skimage.io as io
import numpy as np

sys.path.append("tf-image-segmentation/")
sys.path.append("/home/dpakhom1/workspace/my_models/slim/")

fcn_16s_checkpoint_path = \
 '/home/dpakhom1/tf_projects/segmentation/model_fcn8s_final.ckpt'

os.environ["CUDA_VISIBLE_DEVICES"] = '1'

slim = tf.contrib.slim

from tf_image_segmentation.models.fcn_8s import FCN_8s
from tf_image_segmentation.utils.inference import adapt_network_for_any_size_input
from tf_image_segmentation.utils.pascal_voc import pascal_segmentation_lut

number_of_classes = 21

image_filename = 'me.jpg'

#image_filename = 'small_cat.jpg'

image_filename_placeholder = tf.placeholder(tf.string)

feed_dict_to_use = {image_filename_placeholder: image_filename}

image_tensor = tf.read_file(image_filename_placeholder)

image_tensor = tf.image.decode_jpeg(image_tensor, channels=3)

# Fake batch for image and annotation by adding
# leading empty axis.
image_batch_tensor = tf.expand_dims(image_tensor, axis=0)

# Be careful: after adaptation, network returns final labels
# and not logits
FCN_8s = adapt_network_for_any_size_input(FCN_8s, 32)


pred, fcn_16s_variables_mapping = FCN_8s(image_batch_tensor=image_batch_tensor,
                                          number_of_classes=number_of_classes,
                                          is_training=False)

# The op for initializing the variables.
initializer = tf.local_variables_initializer()

saver = tf.train.Saver()

with tf.Session() as sess:

    sess.run(initializer)

    saver.restore(sess,
     "/home/dpakhom1/tf_projects/segmentation/model_fcn8s_final.ckpt")

    image_np, pred_np = sess.run([image_tensor, pred], feed_dict=feed_dict_to_use)

    io.imshow(image_np)
    io.show()

    io.imshow(pred_np.squeeze())
    io.show()
Let’s display the look up table with mapping from class number to the name of the PASCAL VOC class:
pascal_segmentation_lut()
{0: 'background',
 1: 'aeroplane',
 2: 'bicycle',
 3: 'bird',
 4: 'boat',
 5: 'bottle',
 6: 'bus',
 7: 'car',
 8: 'cat',
 9: 'chair',
 10: 'cow',
 11: 'diningtable',
 12: 'dog',
 13: 'horse',
 14: 'motorbike',
 15: 'person',
 16: 'potted-plant',
 17: 'sheep',
 18: 'sofa',
 19: 'train',
 20: 'tv/monitor',
 255: 'ambigious'}
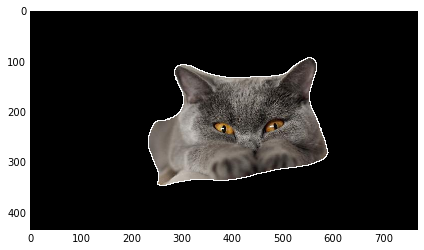
Now, let’s create a contour for our segmentation to make it look like an actual sticker. We save the file as png with an alpha channel that is set up to make background transparent. We still visualize the final segmentation on the black backgound to make the the countour visible. Otherwise, it is hard to see it, because the background of the page is white.
# Eroding countour

import skimage.morphology

prediction_mask = (pred_np.squeeze() == 15)

# Let's apply some morphological operations to
# create the contour for our sticker

cropped_object = image_np * np.dstack((prediction_mask,) * 3)

square = skimage.morphology.square(5)

temp = skimage.morphology.binary_erosion(prediction_mask, square)

negative_mask = (temp != True)

eroding_countour = negative_mask * prediction_mask

eroding_countour_img = np.dstack((eroding_countour, ) * 3)

cropped_object[eroding_countour_img] = 248

png_transparancy_mask = np.uint8(prediction_mask * 255)

image_shape = cropped_object.shape

png_array = np.zeros(shape=[image_shape[0], image_shape[1], 4], dtype=np.uint8)

png_array[:, :, :3] = cropped_object

png_array[:, :, 3] = png_transparancy_mask

io.imshow(cropped_object)

io.imsave('sticker_cat.png', png_array)
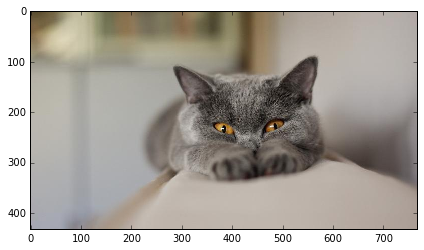
Now, let’s repeat the same thing for another image. I will duplicate the code, because I am lazy. But images can be stacked into batches for more efficient processing (if they are of the same size though).
%matplotlib inline
from __future__ import division
import os
import sys
import tensorflow as tf
import skimage.io as io
import numpy as np
sys.path.append("tf-image-segmentation/")
sys.path.append("/home/dpakhom1/workspace/my_models/slim/")
fcn_16s_checkpoint_path = \
'/home/dpakhom1/tf_projects/segmentation/model_fcn8s_final.ckpt'
os.environ["CUDA_VISIBLE_DEVICES"] = '1'
slim = tf.contrib.slim
from tf_image_segmentation.models.fcn_8s import FCN_8s
from tf_image_segmentation.utils.inference import adapt_network_for_any_size_input
from tf_image_segmentation.utils.pascal_voc import pascal_segmentation_lut
number_of_classes = 21
image_filename = 'small_cat.jpg'
image_filename_placeholder = tf.placeholder(tf.string)
feed_dict_to_use = {image_filename_placeholder: image_filename}
image_tensor = tf.read_file(image_filename_placeholder)
image_tensor = tf.image.decode_jpeg(image_tensor, channels=3)
# Fake batch for image and annotation by adding
# leading empty axis.
image_batch_tensor = tf.expand_dims(image_tensor, axis=0)
# Be careful: after adaptation, network returns final labels
# and not logits
FCN_8s = adapt_network_for_any_size_input(FCN_8s, 32)
pred, fcn_16s_variables_mapping = FCN_8s(image_batch_tensor=image_batch_tensor,
number_of_classes=number_of_classes,
is_training=False)
# The op for initializing the variables.
initializer = tf.local_variables_initializer()
saver = tf.train.Saver()
with tf.Session() as sess:
sess.run(initializer)
saver.restore(sess,
"/home/dpakhom1/tf_projects/segmentation/model_fcn8s_final.ckpt")
image_np, pred_np = sess.run([image_tensor, pred], feed_dict=feed_dict_to_use)
io.imshow(image_np)
io.show()
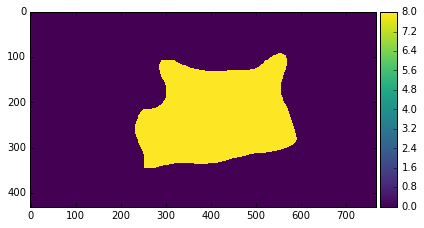
io.imshow(pred_np.squeeze())
io.show()
# Eroding countour

import skimage.morphology

prediction_mask = (pred_np.squeeze() == 8)

# Let's apply some morphological operations to
# create the contour for our sticker

cropped_object = image_np * np.dstack((prediction_mask,) * 3)

square = skimage.morphology.square(5)

temp = skimage.morphology.binary_erosion(prediction_mask, square)

negative_mask = (temp != True)

eroding_countour = negative_mask * prediction_mask

eroding_countour_img = np.dstack((eroding_countour, ) * 3)

cropped_object[eroding_countour_img] = 248

png_transparancy_mask = np.uint8(prediction_mask * 255)

image_shape = cropped_object.shape

png_array = np.zeros(shape=[image_shape[0], image_shape[1], 4], dtype=np.uint8)

png_array[:, :, :3] = cropped_object

png_array[:, :, 3] = png_transparancy_mask

io.imshow(cropped_object)

io.imsave('sticker_cat.png', png_array)
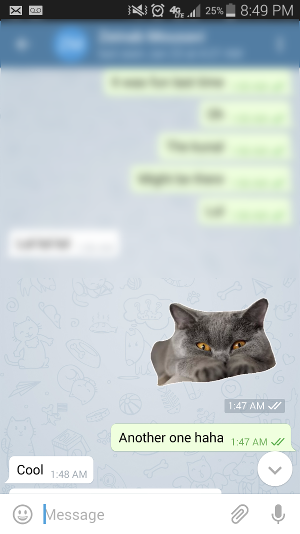
After manually resizing and cropping images to the size of 512 by 512, which can be automated, we created stickers for Telegram using Telegram sticker bot.
Here you can see how they look in Telegram with the transparency and our countour:

Conclusion and Discussion
In this blog post, we presented a library with implemented and trained models from the paper “Fully Convolutional Networks for Semantic Segmentation” by Long et al, namely FCN-32s, FCN-16s, FCN-8s and qualitatively evaluated them by using them to create Telegram stickers.
Segmentation can be improved for more complicated images with application of Conditional Random Fields (CRFs) as a post-processing stage, which we described in the previous post.